
Well, I’ve joined the ranks of bra-sewers! I am so intrigued by the fact that making your own bras is a thing, and that regular people can actually do it! I mean, I’ve known for years it is possible, reading the posts and seeing the enviable results of sewers like Lauren, Novita of verypurpleperson, and Norma of orange-lingerie. It just hasn’t felt like it is achievable – until I have now achieved myself. Behold, one Watson bra, and one knock-off.


First off, I have had tremendous help from reading Lauren’s posts on bra-making. This one breaks down the materials and notions needed, and the two-part post showing step by step how she sewed a Boylston bra is just gold. My Watson experience plus these posts totally gave me the confidence to attempt sewing a bra using a traced pattern with no instructions.
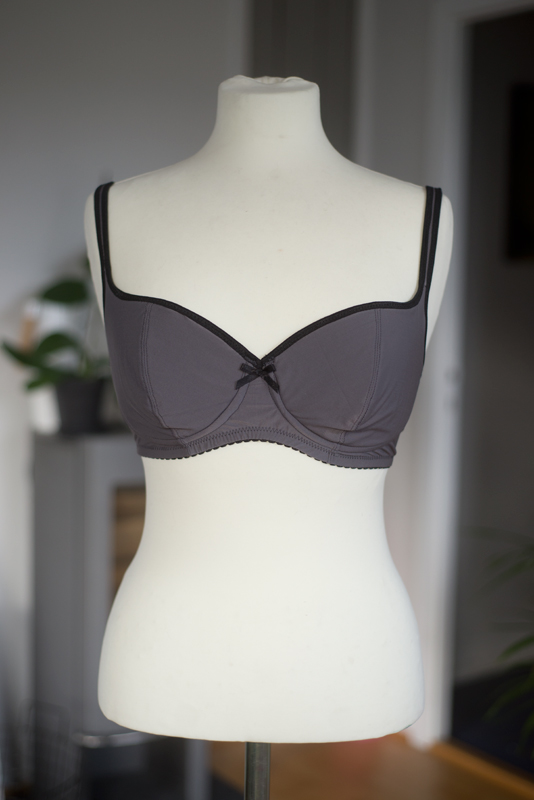
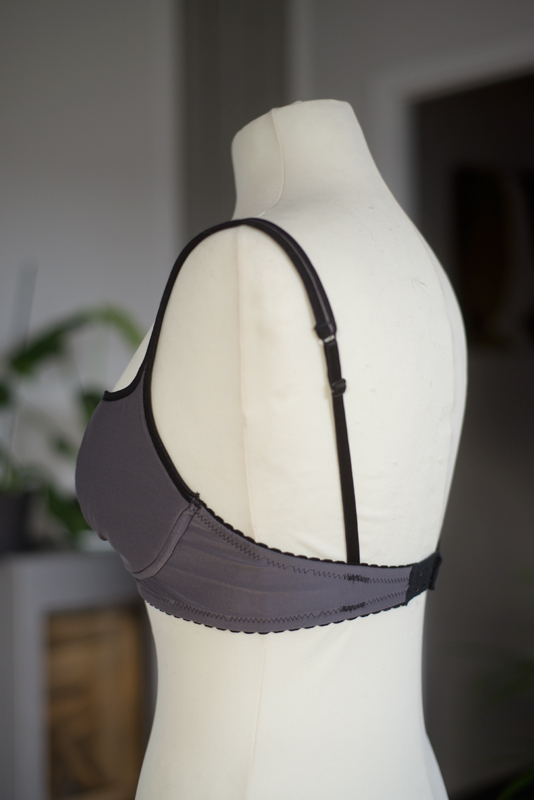
Watson bra
Materials: Miliskin fabric, lining, hooks and eyes, plushback elastic (3/8″ and 5/8″), and strap elastic from a Blackbird fabrics kit. Lace fabric remnant from stash, rings and sliders from old, dead bra.
Pattern: Watson bra from Cloth Habit, and Grace panties from OhLulu (love this pattern! Success every time).

Starting with a Watson bra and a bra-making kit was a very conscious choice on my part to make it easier on myself. The Watson pattern for being a simpler style with a lot of hand-holding, and the kit from Blackbird fabrics so I could skip making by brain hurt from figuring out what to get and where (I just postponed that brain-hurting, since I later decided to try other bra-styles, which needed other kinds of supplies). I actually made two Watson bras, but I’m only showing the one that is wearable. The other ended up in the trash after I salvaged the hooks, eyes, rings and sliders, because really – it was way too small and just not happening. The measurement chart in the pattern put me at a band size 32 and cup size E. I cut a size 3o E (don’t ask me why… mismeasurement?), which as mentioned, was too small. Next attempt I did a size 34 E, which is actually a full two sizes up both in bandwidth, and in cup-size. The fit was much improved. There is some bagginess in the upper part of the cup, which looks like it has to do with shape, or volume distribution, but the cradle part of the cup is fine size-wise.

A lot of people have mentioned the comfort and relaxed style of the bra. I can totally see that, and I was really swayed and optimistic about the longline style, but I am getting some migrating throughout the day where I keep having to pull the bra down. Something isn’t quite working for me, and to be honest I don’t think I will try to figure it out. I tend to prefer underwire padded bras, or none at all, so a Watson-style bra honestly will get limited wear from me. It was a great project to get started though, to get familiar with the construction methods, the materials, and fiddly nature of sewing bras. For the second version I tried a few things differently than from the pattern, notably sandwiching the side/back portion between the miliskin outer fabric and the stable lining, to get a clean-looking inside. I also cut a couple of strips of the lining, and used them to finish the seams where the cups attach to the cradle. It worked beautifully and makes the insides look all professional and lovely!

Speaking of professional, I can’t get over how good this next bra looks like on the inside. I mean, look at this!


Grey balconette bra
Materials: Fabric from stash, lining and powernet from Blackbird fabrics kit. Foam from MakeBra in Finland, plush back elastic (5/8″) from B-wear in Sweden, FOE from my stash (originally from SewSassy) hooks, eyes, rings, sliders and strap elastic from an old, dissected bra.
Pattern: Traced from an old Change bra, this one.
My preferred bra style is a padded balconette type bra. Almost all my bras right now are from Change, and I have found two of their styles in particular fit really really well. So – since I’ve read that a lot of people end up tweaking and testing and muslin-ing their bought bra patterns, and even recommend tracing a well-fitting bra, I decided to start at that end. I took apart the most tired of my well-loved bras, and traced and cleaned up the pattern. The underwire came out and got reused, since there wasn’t really anything the matter with it. It is really a lot of fun taking these little pieces of fabric, putting them together, and bam! You’ve engineered underwear!
The pattern I traced is a fairly classic t-shirt bra, with one vertical seam. It has padded straps, sort of like the Boylston bra, which I really like. Since the straps are set quite wide, it feels like a balconette style, though I think it is a tad more coverage than typical balconette bras. The original had a thin synthetic jersey kind of fabric (I really don’t know my bra fabrics yet) covering the foam cups, and the same fabric for the bridge and cradle. It also has a seam at the narrowest point under the cup, meaning that I would either have grey cups and black bridge and cradle, or grey cup and bridge, and black cradle, or grey everything – layering the thin jersey over the bridge lining and cradle as well as the cups. I thought grey everything would look the least weird, so I went for that! Of course, I didn’t have fold-over elastic (FOE) in grey, so I used the black I had on hand. It made for a pretty sporty look I think.
Construction wise I followed Lauren’s excellent tutorial, as well as checking out my dissected old bra. The Boylston bra doesn’t have FOE, so I had to diverge a little there, in finishing one bra cup seam before attaching the cup, and the other after. The strap elastic is also attached straight down, as opposed to becoming the finishing on the top edge of the cradle, leading to the hooks and eyes. I messed that bit up so it looks less professional in that spot, but the function is still fine.

I was hoping for a pretty bang-on fit since I copied the pattern from one I knew worked well. At the same time, I’ve seen plenty of people mention that changes in fabric really affects the fit. For a first attempt with a foam cup this bra is pretty damn good, with one area of improvement. While the silhouette from the side is nice and rounded, looking straight down it looks a little pointy. I thought there might be an issue of not enough length from left to right, but I made up a foam muslin after some pattern changes that only seemed to make it worse. My next attempt will be to turn the cup into a three-piece pattern, so volume and curves can be distributed along several seams. Theoretically that should improve things – realistically I am bracing myself for quite some trial and error here! If anyone has experiences they want to share, please do!
For my own sake, I will jot down the changes I’d like to make for the next version. I’m thinking the small remnants I have from this floral Bettine dress would make a fun bra!
– Eliminate the seam directly under the cup, and have one at the side seam instead. That seems more par for the course when I look at other bra patterns.
– Get rid of the tiny dart at center front – I think it’s there to cover the ends of the FOE. I’d rather have a continuous elastic, or a bow to cover up the raw edges.
– Move 3/8″ – 1/2″ from the cup to the band at side seams.
– The slinky jersey has much more stretch than the foam, and since I cut them the same size the jersey is loose. If I cover foam cups with stretchy fabrics I should reduce the pattern for the stretchy fabric with at least 10%.
– Remember to attach the strap elastic to the bottom edge *before* the picot edged elastic. Then do the top edge of the cradle before securing the strap elastic to the top.
– Attach underwire casing before FOE elastic on the front/top edge of cup, to attach casing all the way. Secure ends with zig-zag, cover with FOE.
A reapeat picture. But I don’t care – I’m proud!

These look terrific, such chic colours too. I’ve not got much bra making motivation but love making undies, and I’ve got the grace pattern in my stash. Im always delighted when I do making something that looks so professional so totally understand your pride – so awesome!
What an inspiration! You go girl!!!! Maybe next year I will build up some courage to sew a bra. Yours truly look ~off the rack~. Nice job.
Thank you! I say do it! It really isn’t as hard as I thought it would be, just detail-oriented. Heh… off the rack. I am really pleased with how it looks, so thank you Tanya!
HELLO! Those look amazing! I love that your fabric choices totally fit your personal style – elegant, modern, and simple. Great work!
Aaaah! I woke up to a comment from where you’ve described my personal style, and in that way! Thanks for starting my Monday off right! :D (really, I’m sort of thrilled I have a style clear enough to be describable by others, and that it carries into my underwear-making! It put me in such a good mood!)