

I meant to make the Colette Patterns Beignet skirt for the button-themed challenge over at SewWeekly (where I’m a contributor!), but my planned bound buttonholes got the best of me, and I decided buttonholes made in a rush was not worth meeting a deadline. So, it’s lying in pieces around the apartment; the lining by the iron on top of the washing machine, the skirt-parts slung over the chair by the sewing machine, and the pattern on the sofa in the living room. Tell me I’m not the only one leaving her sewing projects all over her house?
Anyways, the Beignet skirt! I’ve seen that quite a few people have had trouble with sewing the lining to the facing, where one concave piece has to be joined to a convex one. I’ve been meaning to do a tutorial on that, so here it is! (It’s also handy for setting in shirt-sleeves, where the sleeve seams are done “flat” before the side-seams are sewn.)
A major thing to keep in mind about joining opposite curves is the seam allowance. Let’s draw some circles:

So, circle #1 is just a circle, with the black line representing the sewing line of any piece. Let’s add pink seam allowance to the inside of the circle (this is to represent any piece of fabric where the curves goes into the patternpiece, like a neckline), we shall call that circle #2. Circle #3 has green seam allowance on the outside of the circle (outward curves, like sleevecaps).
So – if we look at circle #4 and compare the colored lines, they are obviously not the same length. This means that the cut edges of your fabric pattern pieces that you are sewing together, are not necessarily the same length. This is important to take note of because when we are sewing, we don’t want to try to match up the edges of our fabric (the seam allowance) – we want to match up the seam-lines. The seam-lines should be the exact same length, and this, my friends, is step one in avoiding puckers when joining these inverse lines together.
I don’t use pins when I sew these curves. If you’ve ever marked your seam-line, and then pinned the heck out of your fabric, I think you know what I mean. Pins pull the fabric, and it creates an object the sewing foot has to get over. While it’s traveling over that pin, the foot can’t hold the fabric in place against the feed-dog, and things start slipping, the stitches don’t end up on the seam-line, and the tension gets wonky. So, no pins.
Notches however, are good things. Match up any notches the pattern gives you. Additionally, you can measure the pieces of fabric you’re sewing together, and mark the half-way point – maybe even the quarter-points too, or more, depending on how curvy the pieces are, how long they are, and how novice you’re feeling.
![]()
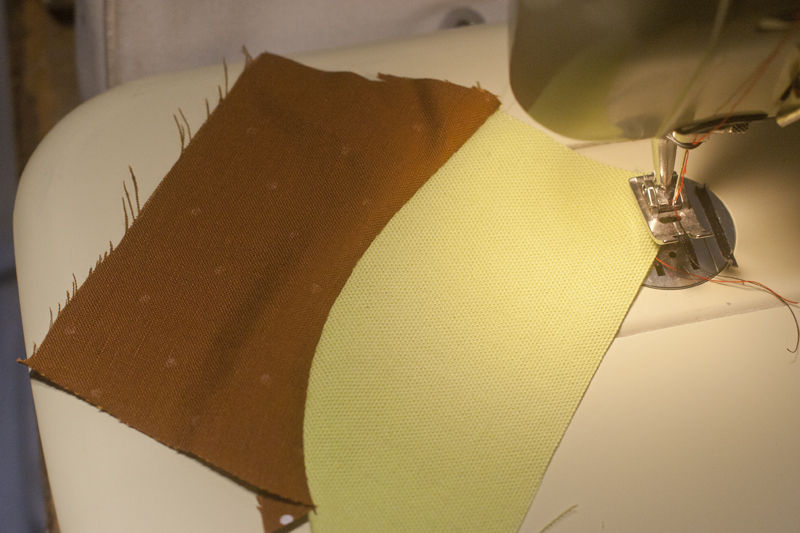
I’ve taped on a piece of artist’s tape to indicate where my ½” mark is, so I can line up the fabric to the left side of the tape and sew consistently at that width.
Let’s move over to the sewing machine. If you don’t have a guideline for your seam allowance on your throat-plate, give yourself one. Masking tape or artist’s tape works just fine. And the bigger the seam allowance, the harder this is going to be to sew. If you have the option of grading down the seam allowance before sewing, you might want to consider that – though you have to grade down very accurately and consistently.
When I sew opposite curves together, I like to keep the piece of fabric with the inwards curve on the bottom, and the piece with the outwards curve on the top.

When lining up curved pieces, you want to line up the edges for the first inch or so, and also line up the top edge where they intersect at the seam-allowance point (in my case, ½” in from the edge).
Line up the two pieces of fabric, and sew a couple of stitches. With the needle in the down position, lift the foot, and reposition the edge of the under-fabric along the seam allowance guide. Rotate the top layer to match. Lower the foot and continue.

The fabrics need to be adjusted, since they don’t line up with each other or the guide any longer.

The bottom layer is shifted so the edge is parallel to the guide as far as possible.

The top layer is repositioned to match the bottom layer as far as possible.
Don’t worry if the two layers don’t match for more than a few stitches – we’ll readjust often. Also, remember that we’re matching up the seam lines, not the cut edge of the seam allowances, so the fabric is going to bunch in the seam allowance, and where we’ve already sewn. That’s ok.

Notice the rippling of the green fabric’s seam-allowance where I’ve already sewn? That’s because the cut line is longer than the seam-line (circle #3 in the illustrations), and it needs more space than at the seam-line.
The point where the two layers diverge is usually a little further down than you think, so I stitch a couple of extra stitches before I readjust. Also, this needs to be done with the two layers moving freely and not being attached to anything at either end. Trust me – I tried otherwise, and it didn’t work nearly as well!
Try really hard not to pull on the fabrics. Smooth out the fabric where the seam will go, and watch out for the notches. You might find that you do have to coax the layers a little to make the notches match up (roughly), but the point is to not pull on the fabric all the time. As you get more comfortable with sewing without pins, and stopping often to correct the positions of the two layers, your opposing curves will just get better, smoother, and easier to sew.

Unclipped and rippling seam allowance.
Notch/clip/grade the seam allowance…

… press…

…ta-da!

Any questions? Confusion? Relief? Comment away!

Brigtte…Although this post is from 2012, I thank you so very much for this very detailed tutorial! I can’t tell you how long I have been searching on how to join opposing curves!! I fellow member of Pattern Review directed me here and I am so happy to have come to your page!!
I’m working on my second ever sewing project and it is a rather complicated top with lots of pieces and many curved seams so I am taking it slowly and doing my best to be careful and neat. I’m being careful so I am basting all seams together first. I need to do it for fitting anyway. Sewing together curved pieces on the lining, which is cotton, was more difficult because it is so light. I had some puckering but I’d say I could have avoided it if I had seen this post earlier and known to notch the seam allowance. The outer shell is a heavy cotton/linen blend with interfacing on both sides and it is so much easier to sew! I still basted everything together but the fabric doesn’t move thanks to interfacing and doesn’t pucker at all because it is thick. I love this fabric.
Mary – it sounds like you’re doing yourself a huge favor taking things slow and basting when you need to. I’ve definitely needed to seamrip after being a little impatient! ;) Seems like you’re enjoying the project, which is great! Happy sewing!
I think as a somewhat novice I will need to read this several times to wrap my head around it. I’m making a toddler dress and trying to attach the yoke to the shoulders etc. I’ve clipped and pinned 1000 times and still have loads of excess so I wanted to try another method. I hope this works!
It’s a bit tricky to wrap your head around, I agree! It’s very much spatial thinking, but I find what helps the most is to remember that the seamline, not the cut edge, that needs to match. Feel free to email me if you get stuck!
Thank you for drawing the circles and explaining with that in mind. I wanted to make a curve and knew where the sewing line was, but was not sure how to cut. The circles helped with my understanding. Thank you so much!
Hi! Great, I’m so glad that was helpful to you! I’m a very visual and tactile learner, so it often helps me work through a problem to draw it (like I did here). Thank you for your comment!
Oh boy thank you so much for this post! I was trying to figure this out with pins and this was is infinitely easier! As long as your pieces are cut right you are good to go. Thank you so much!
Hi Emily – my pleasure! I’m so happy you found this useful, and I agree about the pins, it bunches up terribly and makes things difficult. And you’re totally right – as long as the pieces are cut to the correct length, most of the battle is won! ;)
Thanks for the post. I am working on a quilt with curved pieces, and this is the first time I have attempted curves. The visual you show gives me a bit more confidence that it will work out.
I’m glad you’re finding it useful! Good luck with your quilt, let me know if you have any questions – and do come back and show off your quilt!
Just tried this on two opposing curves and it did not work. It threw the alignment of the notches on the two pieces off so much that they were about 1 1/2 to 2 inches apart. I ended up with a lot of excess fabric on the top layer. It’s not as simple as it seems. :(
I’m sorry it didn’t work out for you! And you’re right – it’s not simple, since we’re coercing the fabric quite a bit while we’re sewing seams like this. With a discrepancy of 1 1/2 – 2″, I’m guessing you were working on a longer seam? In that case, since differences in feed from the feed dog to the foot show up more so on longer seams, I would actually pin those notches, and work between one set of notches at a time to make sure things are on track the entire time.
If you didn’t add the notches yourself, did you measure to see if they were an equal length apart? Unfortunately, sometimes patterns have notches that don’t actually line up. Measure along the seam line, not the cut line, on the two joining pattern pieces (you might have to draw them in if they’re not there), and if they don’t match up, go ahead and move one of them. You might also try adding more notches (every 6 inches or so), to give yourself more “anchors” to stay on track.
And of course, lastly, different fabric types will behave differently, and shifty fabrics like slippery silks, or georgettes, or crepes, or chiffons, will generally be *really* difficult to work with – and especially if trying to sew opposite curves!
I hope that helped, and good luck!
Thanks for these ideas! I did a Google search for “tips for sewing together opposite curves” and this post came right up. I’m used to sewing princess seams where you stitch along the seamline and clip the seam allowance before sewing, but I really want to avoid that step on the thing I’m working one (a toddler top with a very curved yoke sewn to a very curved bodice). I’m going to measure my seamline carefully and notch, and then go for it.
Hi Zina! I’m glad you found my tutorial, and I hope you find it useful! As long as the seamlines are the same length and you go slow, you should be fine! Good luck, feel free to check in and let me know how your toddler top turned out!
Interesting! This looks a lot less tedious than my usual crazy pining method. I’ll definitely give this a try.
Haha! It takes a bit of practice and “finger-feel”, but I agree – I’d definitely call it less tedious.
I tried it! It worked for me but I need to get used to not using pins – they’re almost like a security blanket for me : )
Would this method work if you needed to ease one layer? I guess you could ease stitch the longer layer first and then sew the curves.
I’m so glad you found it helpful! It is quite different from pins; the preparation, handling the fabrics.. I had to get used to it too!
I think for easing one of the layers, I’d do exactly how you described – if you’re easing only one section, some notches would probably be helpful too.
wow! thanks a lot! I love your neat seams :)
Thank you Sophie!
Looks lovely, thanks for sharing this tutorial!
My pleasure – I hope people can find it helpful! It was a bit of a revelation to me when I first learned it.