

I meant to make the Colette Patterns Beignet skirt for the button-themed challenge over at SewWeekly (where I’m a contributor!), but my planned bound buttonholes got the best of me, and I decided buttonholes made in a rush was not worth meeting a deadline. So, it’s lying in pieces around the apartment; the lining by the iron on top of the washing machine, the skirt-parts slung over the chair by the sewing machine, and the pattern on the sofa in the living room. Tell me I’m not the only one leaving her sewing projects all over her house?
Anyways, the Beignet skirt! I’ve seen that quite a few people have had trouble with sewing the lining to the facing, where one concave piece has to be joined to a convex one. I’ve been meaning to do a tutorial on that, so here it is! (It’s also handy for setting in shirt-sleeves, where the sleeve seams are done “flat” before the side-seams are sewn.)
A major thing to keep in mind about joining opposite curves is the seam allowance. Let’s draw some circles:

So, circle #1 is just a circle, with the black line representing the sewing line of any piece. Let’s add pink seam allowance to the inside of the circle (this is to represent any piece of fabric where the curves goes into the patternpiece, like a neckline), we shall call that circle #2. Circle #3 has green seam allowance on the outside of the circle (outward curves, like sleevecaps).
So – if we look at circle #4 and compare the colored lines, they are obviously not the same length. This means that the cut edges of your fabric pattern pieces that you are sewing together, are not necessarily the same length. This is important to take note of because when we are sewing, we don’t want to try to match up the edges of our fabric (the seam allowance) – we want to match up the seam-lines. The seam-lines should be the exact same length, and this, my friends, is step one in avoiding puckers when joining these inverse lines together.
I don’t use pins when I sew these curves. If you’ve ever marked your seam-line, and then pinned the heck out of your fabric, I think you know what I mean. Pins pull the fabric, and it creates an object the sewing foot has to get over. While it’s traveling over that pin, the foot can’t hold the fabric in place against the feed-dog, and things start slipping, the stitches don’t end up on the seam-line, and the tension gets wonky. So, no pins.
Notches however, are good things. Match up any notches the pattern gives you. Additionally, you can measure the pieces of fabric you’re sewing together, and mark the half-way point – maybe even the quarter-points too, or more, depending on how curvy the pieces are, how long they are, and how novice you’re feeling.
![]()
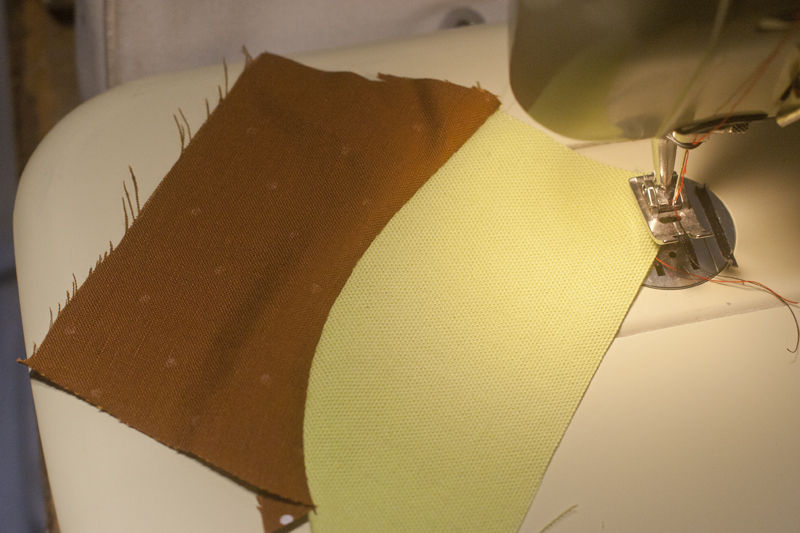
I’ve taped on a piece of artist’s tape to indicate where my ½” mark is, so I can line up the fabric to the left side of the tape and sew consistently at that width.
Let’s move over to the sewing machine. If you don’t have a guideline for your seam allowance on your throat-plate, give yourself one. Masking tape or artist’s tape works just fine. And the bigger the seam allowance, the harder this is going to be to sew. If you have the option of grading down the seam allowance before sewing, you might want to consider that – though you have to grade down very accurately and consistently.
When I sew opposite curves together, I like to keep the piece of fabric with the inwards curve on the bottom, and the piece with the outwards curve on the top.

When lining up curved pieces, you want to line up the edges for the first inch or so, and also line up the top edge where they intersect at the seam-allowance point (in my case, ½” in from the edge).
Line up the two pieces of fabric, and sew a couple of stitches. With the needle in the down position, lift the foot, and reposition the edge of the under-fabric along the seam allowance guide. Rotate the top layer to match. Lower the foot and continue.

The fabrics need to be adjusted, since they don’t line up with each other or the guide any longer.

The bottom layer is shifted so the edge is parallel to the guide as far as possible.

The top layer is repositioned to match the bottom layer as far as possible.
Don’t worry if the two layers don’t match for more than a few stitches – we’ll readjust often. Also, remember that we’re matching up the seam lines, not the cut edge of the seam allowances, so the fabric is going to bunch in the seam allowance, and where we’ve already sewn. That’s ok.

Notice the rippling of the green fabric’s seam-allowance where I’ve already sewn? That’s because the cut line is longer than the seam-line (circle #3 in the illustrations), and it needs more space than at the seam-line.
The point where the two layers diverge is usually a little further down than you think, so I stitch a couple of extra stitches before I readjust. Also, this needs to be done with the two layers moving freely and not being attached to anything at either end. Trust me – I tried otherwise, and it didn’t work nearly as well!
Try really hard not to pull on the fabrics. Smooth out the fabric where the seam will go, and watch out for the notches. You might find that you do have to coax the layers a little to make the notches match up (roughly), but the point is to not pull on the fabric all the time. As you get more comfortable with sewing without pins, and stopping often to correct the positions of the two layers, your opposing curves will just get better, smoother, and easier to sew.

Unclipped and rippling seam allowance.
Notch/clip/grade the seam allowance…

… press…

…ta-da!

Any questions? Confusion? Relief? Comment away!
